
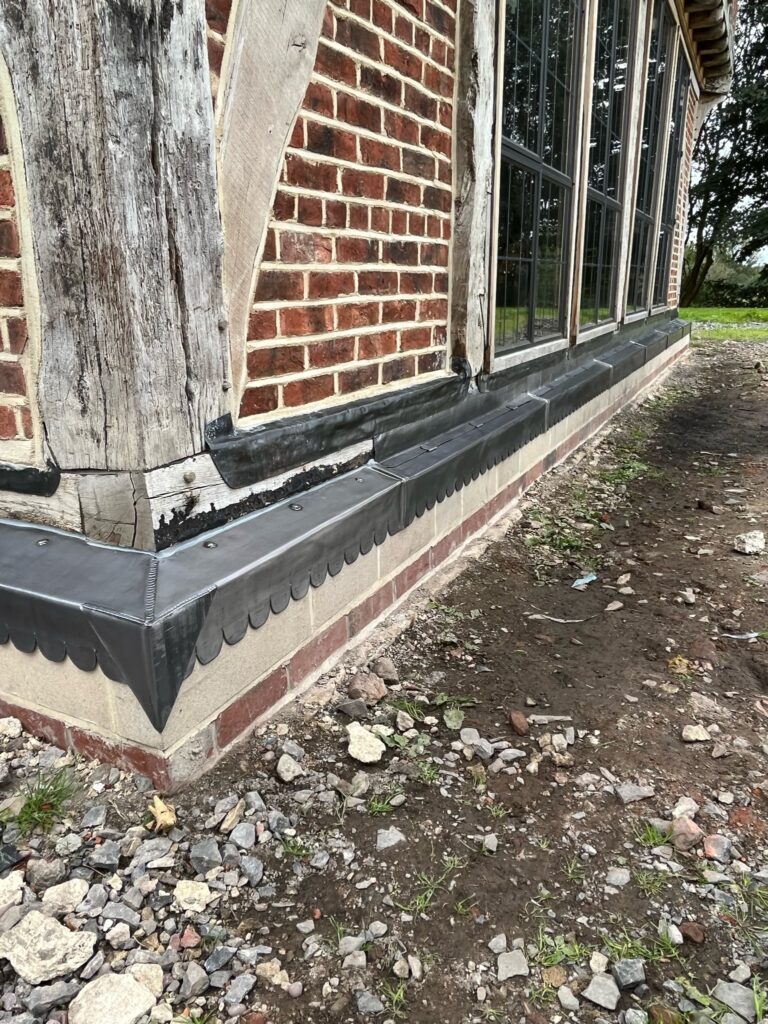
#Proper Leadwork: Cornices, Cappings & Cills—Fixing to Masonry without Cracks
Beautiful façades deserve durable lead cappings. Yet cracks, staining and loose edges happen when movement is ignored and fixings pinch the sheet. This guide covers parapet cappings, cornices and window cills—how to choose codes, form drips, set slip joints, cut chases, and fix to masonry without creating stress points. Follow it and your details will look sharp for decades.
Clips, Nails & Straps
Lead Underlay & Support
Wood Rolls & Timber Cores
The Lead Lads: Services & Prices
Lead Lads Standards Hub
GNR Roofing: Leadwork Authority
Regulatory Standards (BS 6915)
Part 8 of our “Proper Leadwork: Technical Series”. Cross-reference Part 2 (movement), Part 5 (rolls) and Part 6 (bay sizing).
1) Principles of lead cappings to masonry
- Movement first: Long, sun-exposed runs expand and contract. Your lead cappings must slide and breathe.
- Water path second: Form explicit drips and throatings. Never let water track behind or under returns.
- Fixings last: Clip and strap to resist uplift; do not pin laps or corners.
- Modest bays: Break long runs into smaller panels with discreet joints.
- Respect the façade: Align joints to architectural rhythms for a deliberate look.
2) Code choice & bay sizing for cappings
Choose code by span, exposure and traffic (maintenance footfall on parapets). For most cappings and cornices use Code 5–6. On very wide copings or severe exposure step to 7. Keep bay widths modest and add expansion breaks at sensible intervals.
| Detail | Typical Code | Indicative Bay Width | Panel Length | Notes |
|---|---|---|---|---|
| Parapet capping | 5–6(7) | 450–700 mm | ≈1500–2000 mm | Straps at 300–400 mm; welts on long edges (exposure) |
| Cornice cover | 5–6 | Profile-dependent | ≈1200–1800 mm | Use roll/standing details to break runs cleanly |
| Window/door cill cover | 4–5 | Depth-dependent | ≈1000–1500 mm | Sharp, even drips; neat end returns |
3) Drips, throatings & water-shedding edges
Edges decide whether façades stain. Therefore, form clear drips and include throatings under overhangs to break surface tension.
- Parapet drip: 20–25 mm projection; smooth radius; consistent line.
- Cornice throating: Undercut groove beneath the nose to force droplets to fall clear.
- Cill front edge: 15–20 mm drip with neat arris; avoid kinks that stain the wall.
- Welts: Welt long edges in exposure to stiffen and resist capillary tracking.
4) Slip joints, laps & expansion breaks
Long, sunlit cappings move a lot. Use slip joints so adjacent panels can travel without tearing. Keep laps generous and free of fixings.
| Joint Type | Where to Use | Indicative Lap | Notes |
|---|---|---|---|
| Slip joint (covered) | Long straight runs | 100–150 mm | Hidden under a cover piece/roll; allows slide |
| Roll joint | Visible breaks/corners | — | Acts as movement break and aesthetic feature |
| Butt + cover plate | Where access needed | 100–150 mm | Keep cover free of fixings over lap zone |
If in doubt, use more joints rather than fewer. Smaller panels = lower stress.
5) Fixing to masonry: clips, straps & chases
Fixings must restrain uplift but not pinch movement. Into masonry, rely on clips and straps into sound substrates, and use chases where the detail demands it.
- Clips/straps: Copper or stainless at 300–400 mm centres; closer in exposure.
- Chases: If the capping returns into a chase, cut ~25 mm deep; wedge and point with compatible mortar or neutral-cure sealant.
- No pinning in laps: Keep all fasteners out of slip zones and laps.
- Substrate check: Repair friable stone or weak joints before fixing.
6) Substrates: stone, brick, render & coping stones
Each substrate behaves differently. Design your lead cappings around the base material.
| Substrate | Detail Approach | Notes |
|---|---|---|
| Natural stone | Slip joints + throated drips | Test discreet area; avoid spalls when cutting chases |
| Brick (solid) | Clips/straps + welted edges | Even chase depth; consistent returns |
| Rendered/block | Capping under a render bead | Keep drip proud of render; don’t trap movement |
| Coping stones | Full-width capping with drips both sides | Step joints over coping joints; maintain falls outward |
7) Cornices: profiles, arrises & shadow lines
Cornices deserve crisp profiles. Use rolls to divide runs and to echo mouldings. Keep arrises smooth and consistent so shadow lines read as deliberate, not accidental kinks.
- Profile matching: Template complex mouldings before forming.
- Rolls: Place at regular centres to break runs and allow movement.
- Arrises: Soft radii reduce stress and look superior from street level.
8) Cills & string courses: neat returns
Cills collect dirt and show streaks first. Therefore, your lead cappings here need sharp drips and tidy end returns.
- Front drip: 15–20 mm with throating; constant along the façade.
- End returns: Turn down and back neatly; avoid capillary traps at mitres.
- Fixings: Concealed clips; no visible nails near the front arris.
9) A 9-step capping workflow
- Survey substrate soundness; confirm exposure and façade rhythm.
- Choose code (5–6 typical; 7 in severe exposure/wide spans).
- Set falls & drips (projecting, throated, and visible).
- Break into bays with slip/roll joints at 1200–2000 mm.
- Lay out fixings (clips/straps 300–400 mm; laps unpinned).
- Prepare chases (~25 mm) and coordinate render/bead interfaces.
- Form arrises with soft radii; welt long edges in exposure.
- Underlay & deck (low-friction support; smooth surface).
- QA photos: joints, drips, returns and chase finishes.
10) Worked examples
Example A: Parapet capping on brick terrace (urban)
- Code: 6; bays 600–650 mm; panel length ~1800 mm with slip joints.
- Drips: 20–25 mm both sides; welted long edges.
- Fixings: Straps/clips @ 300–350 mm; laps free of nails.
Example B: Stone cornice on heritage façade
- Code: 5–6; rolls at regular centres to echo moulding rhythm.
- Arrises: Soft radii; throated nose to stop tracking.
- Joints: Covered slip joints every ~1500 mm, aligned to pilasters.
Example C: Lead cill covers to mixed window set
- Code: 4–5; 15–20 mm front drip with throating.
- Returns: Neat end folds; no capillary traps.
- Fixings: Concealed clips; no visible nails at the nose.
11) Common defects & remedies
- Cracks at corners: Sharp folds and pinned laps. Remedy: Re-form with soft radius; free the lap; add a slip joint.
- Staining on façades: No throating or short drips. Remedy: Re-form drips; add undercut throating; keep proud of render.
- Loose edges: Weak substrate or overpacked chase. Remedy: Repair substrate; re-cut ~25 mm; point with compatible materials.
- Rippled runs: Over-wide bays; fixings too tight. Remedy: Shorten panels; reset clip/strap centres.
12) On-site checklist (printable)
- Code selected: 5–6 (7 if severe exposure/wide span) ✅
- Falls and projecting drips with throatings set ✅
- Bays broken into 1200–2000 mm with slip/roll joints ✅
- Clips/straps @ 300–400 mm; laps unpinned ✅
- Chases ~25 mm; compatible pointing; render beads coordinated ✅
- Arrises/returns formed with soft radii; welts on long edges ✅
- Deck/underlay smooth and low-friction ✅
- QA photos: joints, drips, chases, returns ✅
13) Useful links & where to buy
