


Leadwork for Roofing: Rolled Lead Sheet, Details and Best Practice
Leadwork is one of the oldest and most technically demanding roofing crafts. When designed and installed correctly, rolled lead sheet can form beautiful, durable and highly weather-resistant roof coverings, flashings, gutters, dormers, valleys, parapets and architectural details.
This guide explains the core principles of lead roofing: what rolled lead sheet is, how lead codes work, where different codes are used, how lead should be fixed, how thermal movement is controlled, why substrates matter, when ventilation is required, and why details such as clips, wood rolls, underlays, welding and patination oil are critical.
The Lead Lads ® install and advise on leadwork across Yorkshire and the North of England. We also supply rolled lead sheet, fixings, wood rolls, underlay and accessories through The Lead Shop.
Much of modern UK leadwork guidance is informed by the Lead Sheet Training Academy, the Rolled Lead Sheet Manual, BS EN 12588 and BS 6915:2001+A1:2014.

What is Rolled Lead Sheet?
Rolled lead sheet is a malleable roofing metal used to create weathertight coverings and details. It is commonly used for lead flashings, chimney flashings, valley gutters, box gutters, lead bays, dormers, parapets, ridges, hips, weatherings and complete lead roof coverings.
In the UK, rolled lead sheet for roofing should be manufactured to BS EN 12588. This standard relates to the thickness, consistency and quality of the lead sheet. Correctly manufactured lead, combined with correct design and installation, allows leadwork performance to be reliably predicted.
Used properly, lead can last for generations. Used incorrectly, it may split, crack, stain, corrode or fail prematurely. Most leadwork failures are not caused by the material itself, but by poor detailing, excessive bay sizes, hard restraint, lack of ventilation, unsuitable substrates, poor fixing or incorrect code selection.
Lead Codes Explained: Code 3, Code 4, Code 5, Code 6, Code 7 and Code 8
Lead codes refer to the thickness and weight of rolled lead sheet. The higher the code, the thicker and heavier the lead. Code selection depends on the detail, exposure, bay size, fixing method and movement requirements.
Code 3 lead is 1.32mm thick and weighs approximately 14.97kg/m². It is usually identified by a green label.
Code 3 is commonly used for soakers and concealed details. It should not generally be used for exposed flashings or larger external weatherings where greater durability is required.
Code 4 lead is 1.80mm thick and weighs approximately 20.41kg/m². It is usually identified by a blue label.
Code 4 is commonly used for cover flashings, stepped flashings, pitched valley linings, small weatherings and vertical cladding. It is a common choice for general lead flashing work, subject to exposure and detail size.
Code 5 lead is 2.24mm thick and weighs approximately 25.40kg/m². It is usually identified by a red label.
Code 5 is highly versatile and is often used for lead flashings, valley linings, back gutters, aprons, bay roofs, small lead dormers and more robust weathering details.
Code 6 lead is 2.65mm thick and weighs approximately 30.50kg/m². It is usually identified by a black label.
Code 6 is used for more exposed details, flat lead roof coverings, gutters, valleys, box gutters, sumps, channels and areas requiring greater robustness.
Code 7 lead is 3.15mm thick and weighs approximately 35.72kg/m². It is usually identified by a white label.
Code 7 is typically used for high exposure, heritage, ecclesiastical and large-scale lead roofing applications where increased durability and larger bay sizes may be required.
Code 8 lead is 3.50mm thick and weighs approximately 40.26kg/m². It is usually identified by an orange label.
Code 8 is reserved for demanding lead roofing work, cathedrals, large public buildings, exposed roof areas and specialist heritage applications where maximum durability is required.
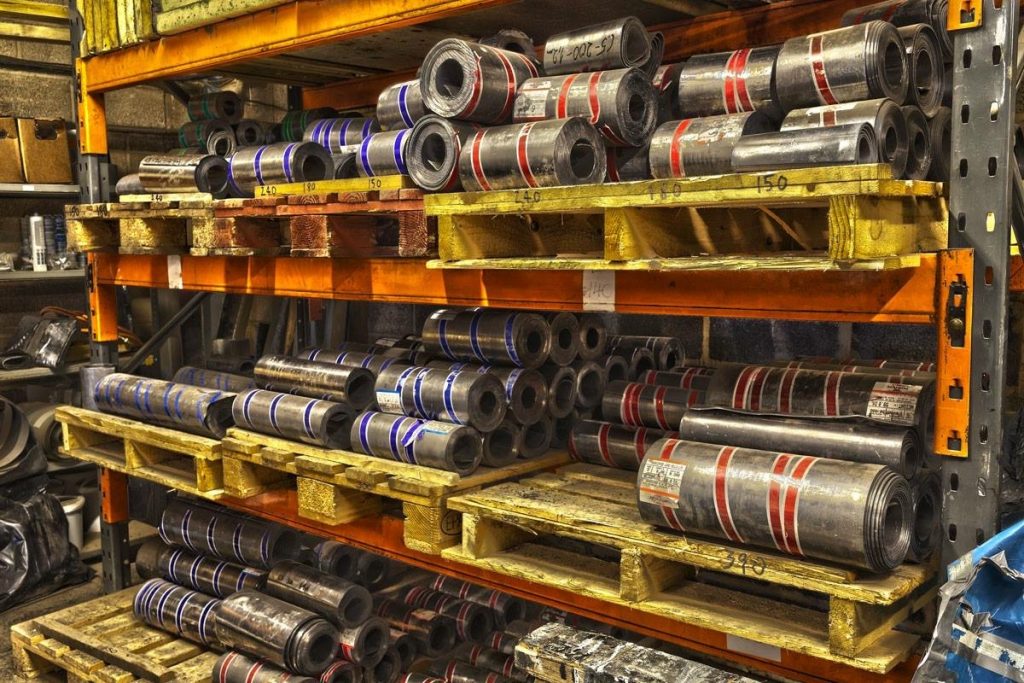
What Do Different Codes of Lead Look Like?
The images below show examples of rolled lead sheet and labels used to identify different lead codes.


How to Install Leadwork Correctly
Installing leadwork correctly requires training, experience and attention to detail. Lead is a flexible material, but it is not forgiving when restrained, oversized, fixed incorrectly or installed over unsuitable substrates.
The key principles of good leadwork are:
- Use rolled lead sheet manufactured to BS EN 12588.
- Design and install in accordance with BS 6915 and recognised lead sheet guidance.
- Select the correct code of lead for the exposure and detail.
- Allow for thermal expansion and contraction.
- Use correct bay sizes, laps, drips, rolls and clips.
- Provide suitable underlay and substrate preparation.
- Ventilate cold roof constructions or form a properly sealed warm roof build-up.
- Use patination oil to control early staining.
- Avoid over-fixing or hard restraint.
For more detail on movement-related failures, see our guide to thermal movement in lead roofs and our lead bay roof guide.

Leadwork Training and Experience
Training is available through the Lead Sheet Training Academy, which provides practical leadwork training on full-scale rigs. Formal training helps develop the foundation for lead welding, bossing, flashings, weatherings, dormers, roof coverings and heritage leadwork.
However, site experience remains essential. Real buildings introduce complex interfaces: irregular masonry, historic substrates, existing roof coverings, limited falls, awkward junctions, access restrictions and conservation constraints. Good leadwork often requires interpretation of the principle, not just repetition of a standard detail.
Common Leadwork Training Areas
- Lead soakers and stepped flashings.
- Bossed and welded front aprons.
- Single stepped flashings.
- Lead, stainless steel and copper clips.
- Back gutters and chimney flashings.
- Apron flashings to profiled tiles.
- Butt welds and lap welds.
- Corner gussets and cover patches.
- Lead saddles at roof apexes.
- Lead slates and roof penetrations.
- Pitched valley gutters and lead ridge details.
- Welted parapet cappings.
- Cornice details and welded corners.
- Chute outlets.
- Catch pits and sumps.
- Bossed gutter drips.
- Welded gutter drips.
- Roll ends and abutment roll ends.
- Eaves-to-wall abutments.
- Staggered wood rolls.
- In-line wood rolls.
- Wood rolls to drips on pitched roofs.
- Hollow rolls and laps.
- Flat lead roof bay setting out.
- Lead dormer front aprons.
- Lead secret gutters.
- Jamb and head cladding.
- Cheek and jamb interfaces.
- Lead back gutters.
- Complete lead dormer cladding.
- Vertical lead cladding.
Leadwork Project Examples
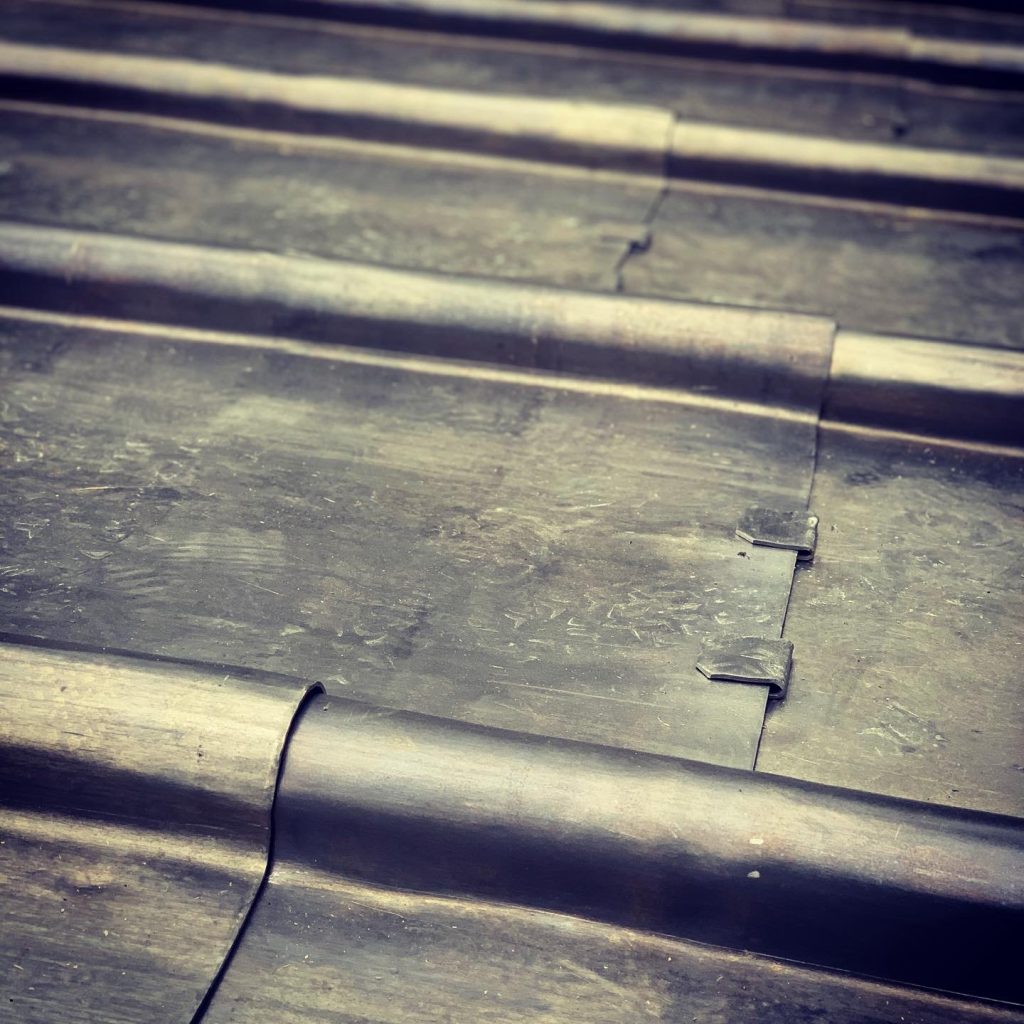
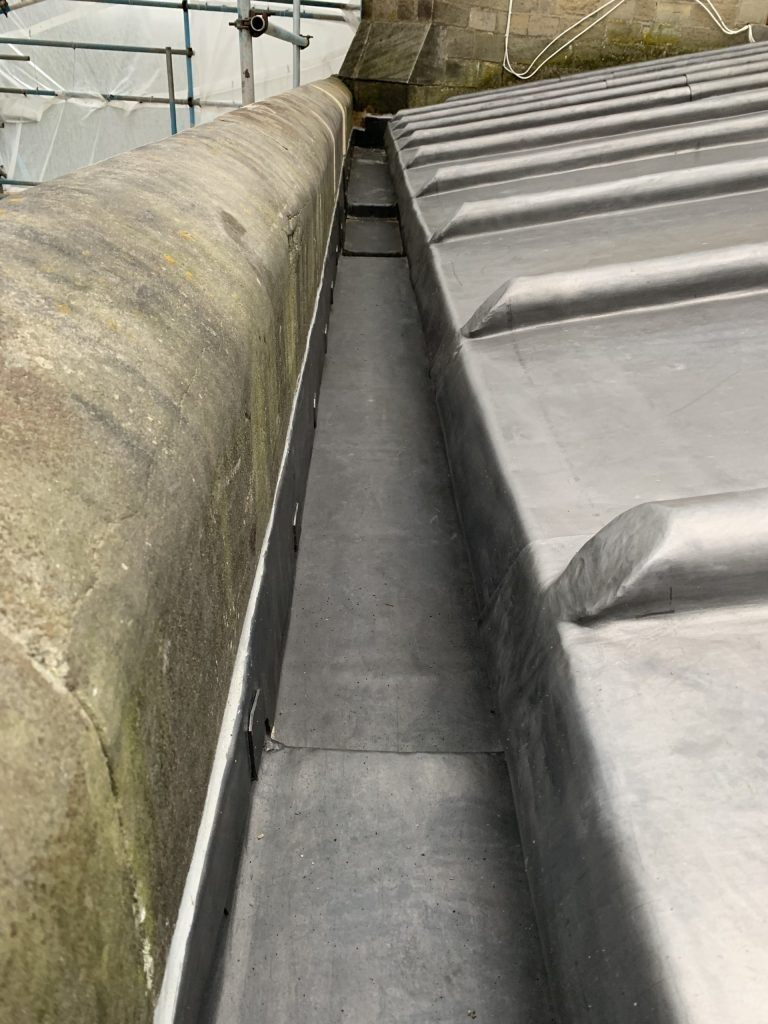
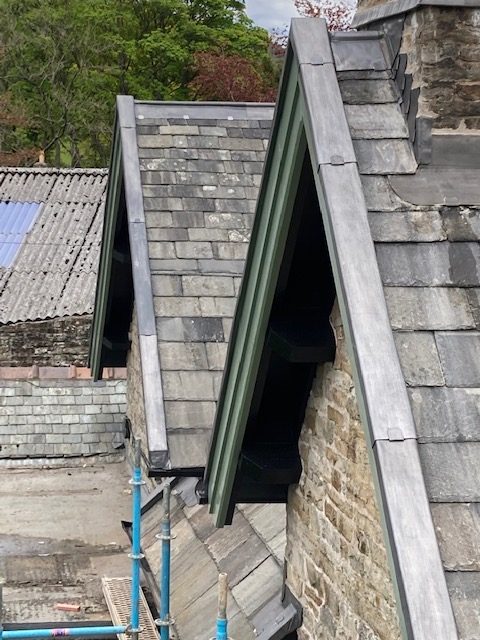
The following gallery includes examples of lead roofing, flashings, dormers, wood rolls, welded details and weatherings completed by The Lead Lads ®.








Basic Lead Working Tools
- Flat dresser: used for dressing lead flat during setting out and finishing.
- Bossing stick: used for forming lead around timber rolls and details.
- Bending stick: useful for shaping lead around roll ends and tight interfaces.
- Bossing mallet: used with bossing tools to form neat curved details.
- Setting-in stick: used to form creases and folds.
- Chase wedge: used for setting lead into chases and folds.
Lead Welding Tools
Lead welding allows details to be formed where bossing alone would weaken the material or where a watertight welded joint is required. Lead melts at approximately 327.4°C, but oxy-acetylene equipment produces much higher working temperatures.
- Oxygen bottle.
- Acetylene bottle.
- Welding torch, often a Model O type.
- Regulators and gauges.
- Flashback arrestors.
- Lead welding rods.
- Appropriate PPE and fire controls.
British Standards for Leadwork
Lead sheet manufacture is covered by BS EN 12588. The design and construction of fully supported lead sheet roof and wall coverings is covered by BS 6915:2001+A1:2014.
These standards and associated guidance cover the design principles for lead sheet roof coverings, wall coverings, flashings, gutters, fixings, substrates, movement joints and detailing. The objective is simple: lead must be able to move, shed water and remain supported without being damaged by condensation, abrasion, corrosion or hard restraint.

Substrates for Leadwork
A leadwork substrate must support the weight of the lead sheet and provide adequate fixing strength. Common substrates include softwood boarding, plywood, masonry and concrete. The surface should be smooth, dry and suitable for the selected underlay.
Timber Substrates
Timber is a traditional substrate for leadwork. Tongue-and-groove or plain-edged softwood boards are commonly used. Gaps between boards should be controlled so that the lead does not deform over time.
- Code 5 and Code 6: gaps should generally not exceed 5mm.
- Code 7 and Code 8: gaps should generally not exceed 10mm.
- Plywood should normally be exterior grade and at least 18mm thick.
- Fixings should be punched below the surface to prevent witness marks through the lead.
Concrete and Masonry Substrates
Concrete and masonry substrates should be smooth, reasonably dry and covered with a suitable lead underlay. The lead must be able to move without abrasion to its underside.
Insulated Substrates and Warm Roofs
Lead sheet should not usually be laid directly onto insulation boards. Where insulation is required, a properly designed warm roof build-up should include a sub-deck, vapour control layer, insulation and upper deck suitable for the lead covering.
Oak, Cedar and Acidic Timbers
Some timbers, including oak and cedar, contain organic acids that may corrode lead if the materials are in direct contact. Suitable underlay and ventilation are important when lead is installed over these substrates.
Bi-Metallic Corrosion
Lead can be used with copper, stainless steel, zinc and aluminium in many roofing situations. Mild steel, galvanised steel and iron should generally be avoided where exposed to moisture. Marine environments require additional care, particularly when using aluminium clips.

Bossing Lead
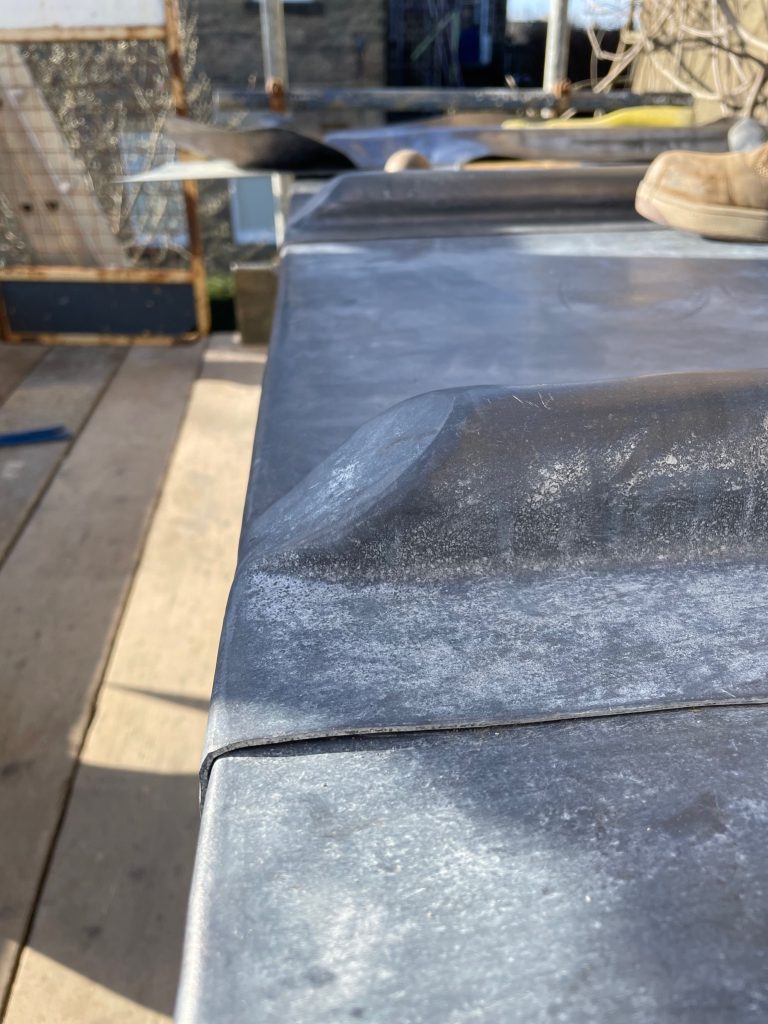
Bossing is the process of forming lead by working the material into shape. A good bossed detail is free from cracks, splits and excessive thinning. The material must not be overworked or weakened.
When bossing lead, the thickness of the sheet should not be reduced excessively. As a practical principle, lead should not be thinned by more than 25% during forming. If a detail cannot be bossed without overworking the material, lead welding may be the better solution.
The image below shows a bossed roll end formed on a lead bay window roof.

Ventilation Details for Lead Roofs
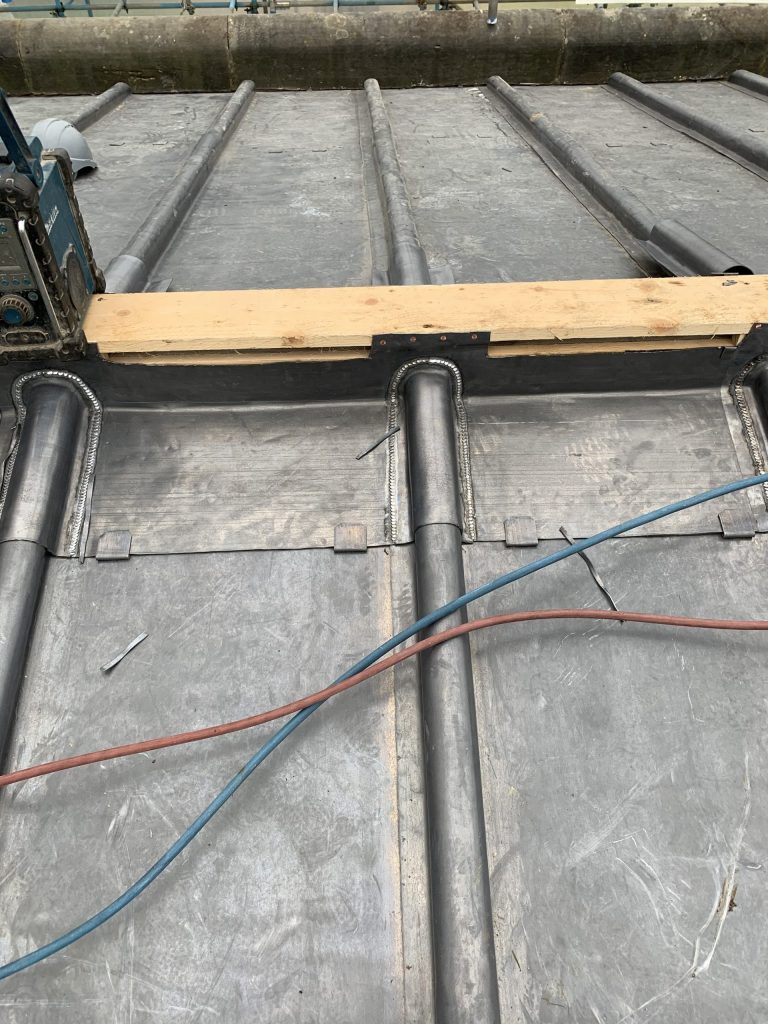
Cold lead roofs require free movement of air beneath the substrate to reduce condensation and underside corrosion risk.
Ventilation for Leadwork
When lead is installed as a cold roof, ventilation is often required beneath the substrate. This helps reduce the risk of condensation forming below the lead and causing underside corrosion.
A ventilation path should normally include an inlet and outlet so cold air can pass continuously beneath the roof deck. On complex roofs, ventilation may need to be formed through eaves, abutments, raised steps, ridge details, vented kerbs or purpose-made ventilation paths.
Useful Components for Ventilation Details
- Stainless steel insect mesh.
- Stainless steel coil for formed vent sections.
- Treated softwood or plywood for raised vented details.
- Staples and mechanical fixings.
- Careful setting out before the lead is installed.
Warm Roof Alternative
Where ventilation is not practical, a warm roof build-up may be used. A warm roof typically includes:
- Sub-deck, usually plywood or timber boarding.
- Vapour control layer, sealed at laps and penetrations.
- Rigid insulation above the VCL.
- Upper deck suitable for leadwork.
- Lead underlay and lead covering above.
The vapour control layer is critical. Poor VCL detailing can allow warm moist air to reach cold surfaces and create condensation risk.

Leadwork Underlays
Lead underlay is commonly formed using building paper, a high-strength bituminous paper placed between the substrate and the lead sheet. Vapour-permeable roofing membranes are not usually suitable directly beneath leadwork.
Installing Lead Underlay
- Install underlay onto a dry substrate.
- Lay underlay in strips in the direction of the fall.
- Do not trap moisture beneath the lead.
- Do not drape underlay over drip edges.
- Turn underlay up at abutments where appropriate.
Typical Underlay Selection
- Exterior grade plywood: Class A building paper to BS 1521.
- Penny gap softwood boarding: building paper or geotextile underlay.
- Oak boarding: building paper only.
- Stone, concrete and brick: building paper leadwork underlay.
You can buy building paper lead underlay online here.

Patination Oil for Leadwork
New lead sheet can develop uneven white carbonate staining when exposed to rain and damp conditions. This staining can run onto surrounding slates, tiles, masonry, glass and other roof finishes.
Patination oil should be applied to exposed leadwork at the end of each working day and again upon completion where needed. It should also be applied between laps where staining could wash out from untreated hidden faces.
For supply, see patination oil at The Lead Shop.

Clips for Leadwork
Clips are essential for securing leadwork without preventing thermal movement. They are commonly used at free edges, rolls, ridges, flashings, welts and exposed details.
Lead sheet should not be hard fixed where movement is required. Clips provide restraint while allowing expansion and contraction. Copper and stainless steel clips are commonly used for robust fixing.
Lead Clips
Lead clips can be used in some situations, but lead has lower mechanical strength than copper or stainless steel. Where lead clips are used, a thicker code should be considered.
Stainless Steel Clips
Stainless steel clips are strong, durable and effective. Terne-coated stainless steel may be used where visible clip appearance matters.

Stainless Steel Clips
Stainless steel clips used to secure a lead ridge capping at regular centres. They provide strong resistance to wind uplift while allowing the leadwork to move.
Copper Clips
Copper clips should usually be at least 50mm wide and of suitable thickness. Copper is widely used with lead but will weather and discolour over time.

Nails and Screws for Leadwork
Nails used for leadwork are commonly large-headed copper or stainless steel. Annular ring, helical ring or serrated shanks help provide secure fixing into the substrate.
A common leadwork nail size is 25mm x 3.35mm, subject to the detail and substrate. Screws may also be used where appropriate and should normally be brass or stainless steel with suitable washers.

Wood Rolls for Lead Roofing
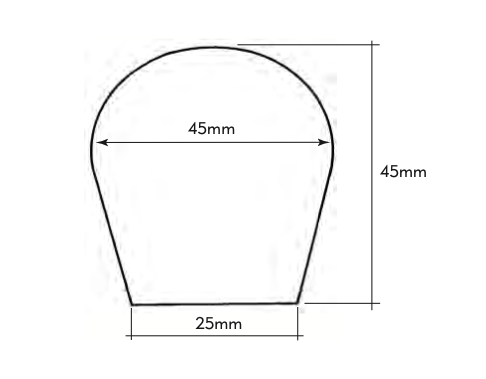
Wood rolls, sometimes called mopsticks, are a core component of traditional lead roofing. They separate lead bays, prevent wind uplift, create mechanical joints and allow lead sheets to move independently.
Wood rolls are used for:
- Flat and pitched lead roof areas.
- Lead dormers.
- Lead bay windows.
- Lead parapets.
- Lead hips and ridges.
- Vertical lead cladding and turrets.
Correct roll sizing, splash laps, undercloaks, overcloaks and clip placement are critical. Wood rolls are not decorative extras; they are movement-control details.

Alternatives to Wood Rolls
In some details, alternative timber sections or proprietary expansion joints may be required. However, where lead bays, lead hips, lead ridges or bay roofs are being formed, there is usually no substitute for a correctly sized and correctly installed wood roll.


Lead Welding: Why, Where and How?
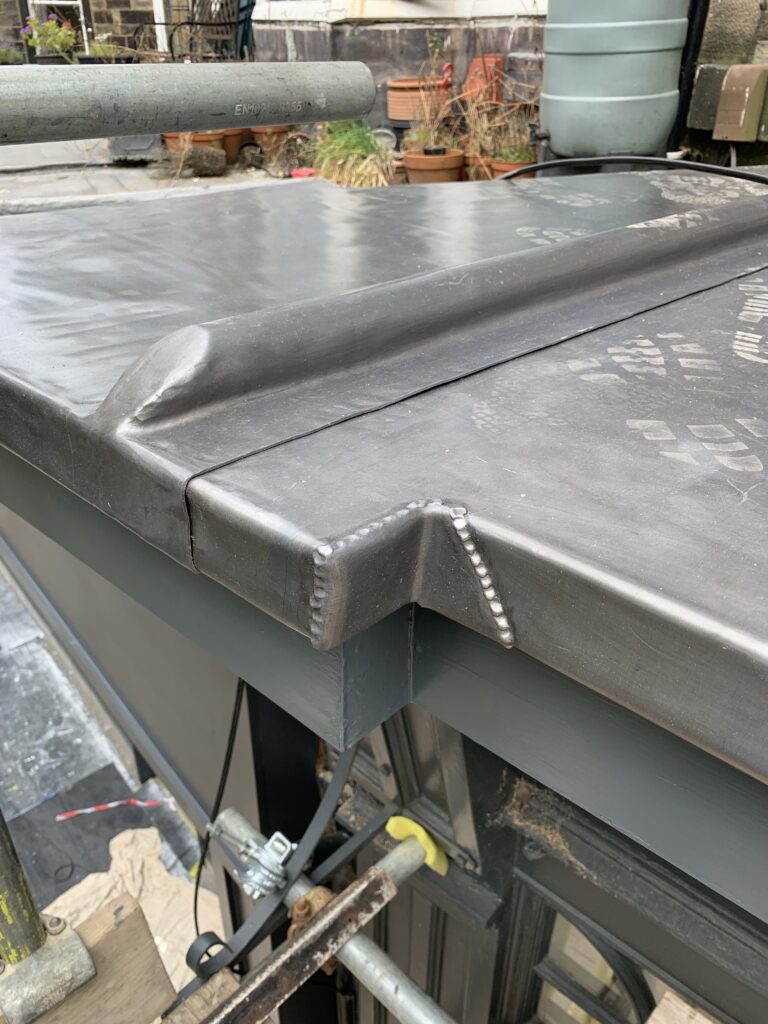
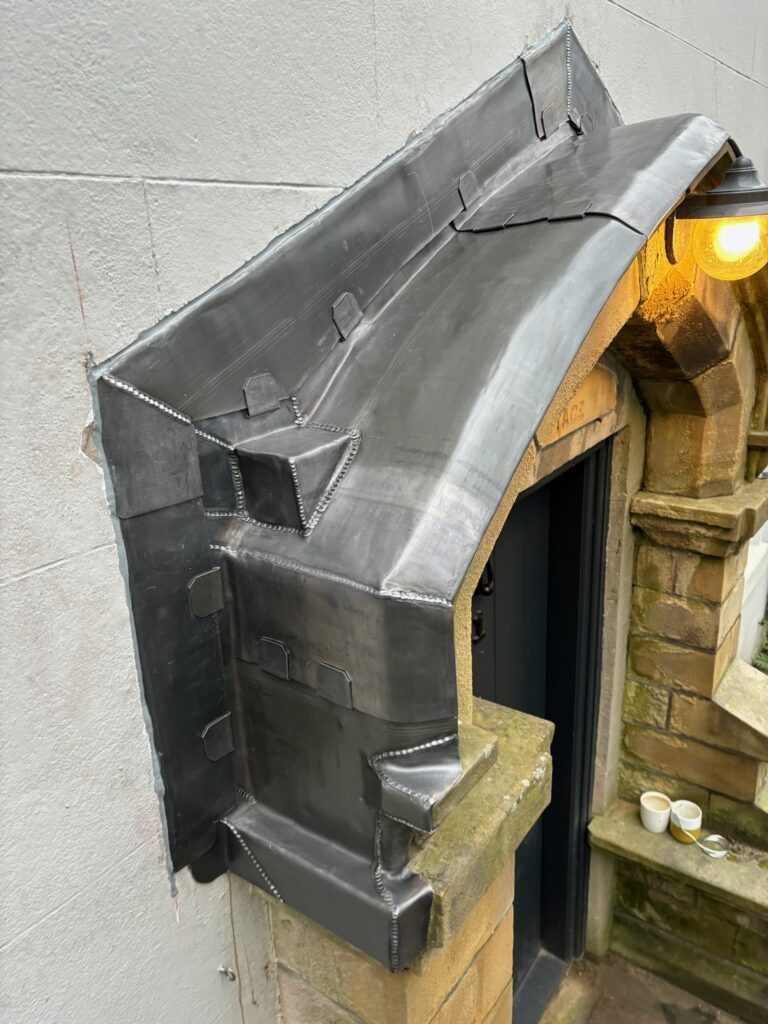
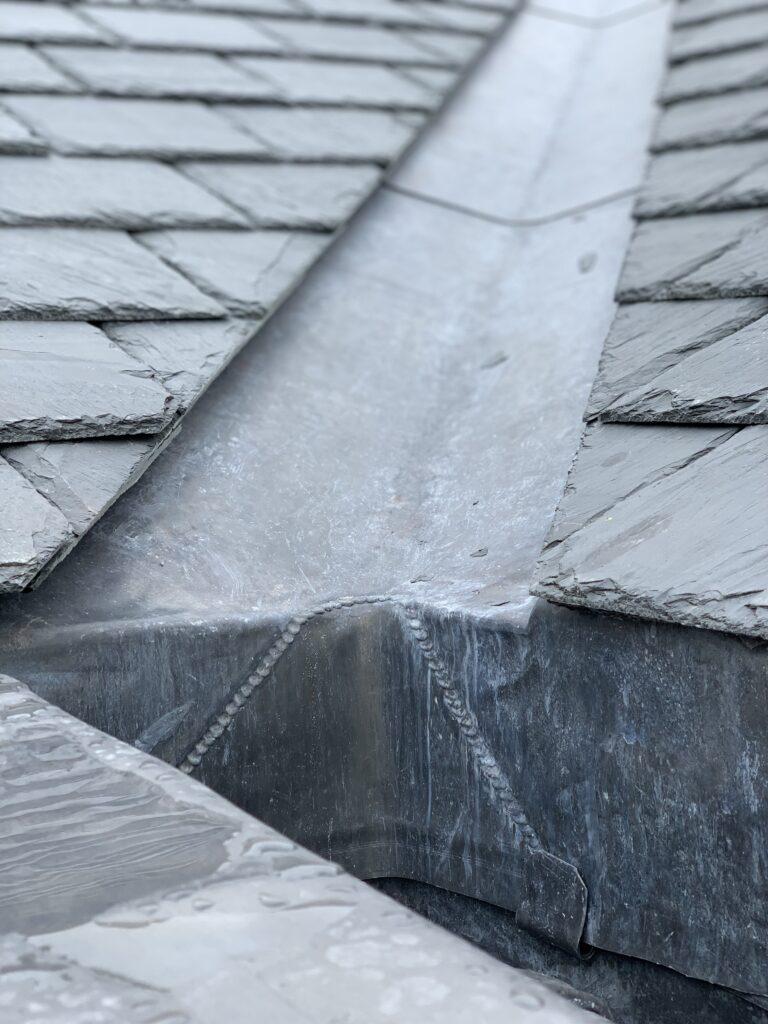
Lead welding is a method of jointing rolled lead sheet to create strong, weatherproof details. It is often used where bossing would weaken the material or where a detail cannot be formed cleanly from a single sheet.
Why Lead Welding Matters
Bossing can thin lead where the sheet is worked around complex shapes. If the material is overworked, the detail may be weakened. Welding allows a patch, gusset or joint to be formed while maintaining the integrity of the lead sheet.
Common Lead Welding Applications
- Lead back gutters.
- Lead valleys and valley outlets.
- Lead aprons.
- Lead bay corners.
- Tunnels over roll details.
- Lead dormer window interfaces.
- Tabs welded to cover flashings.
- Lead hip and ridge apex details.
- Abutment upstands.
- Lead slates, bat slates and SVP penetrations.
- Expansion joints in lead gutters.

Basic Principles of Lead Welding
- Safety first: use PPE, ventilation and fire controls.
- Prepare the lead: clean, shave and align the surfaces before welding.
- Control the flame: use a controlled flame to avoid burning through the lead.
- Use compatible rods: lead welding rods should be suitable for the sheet being welded.
- Tack before welding: tack pieces into position before completing the seam.
- Inspect the weld: check continuity, strength and finish after cooling.
- Apply patination oil: protect the finished exposed leadwork.
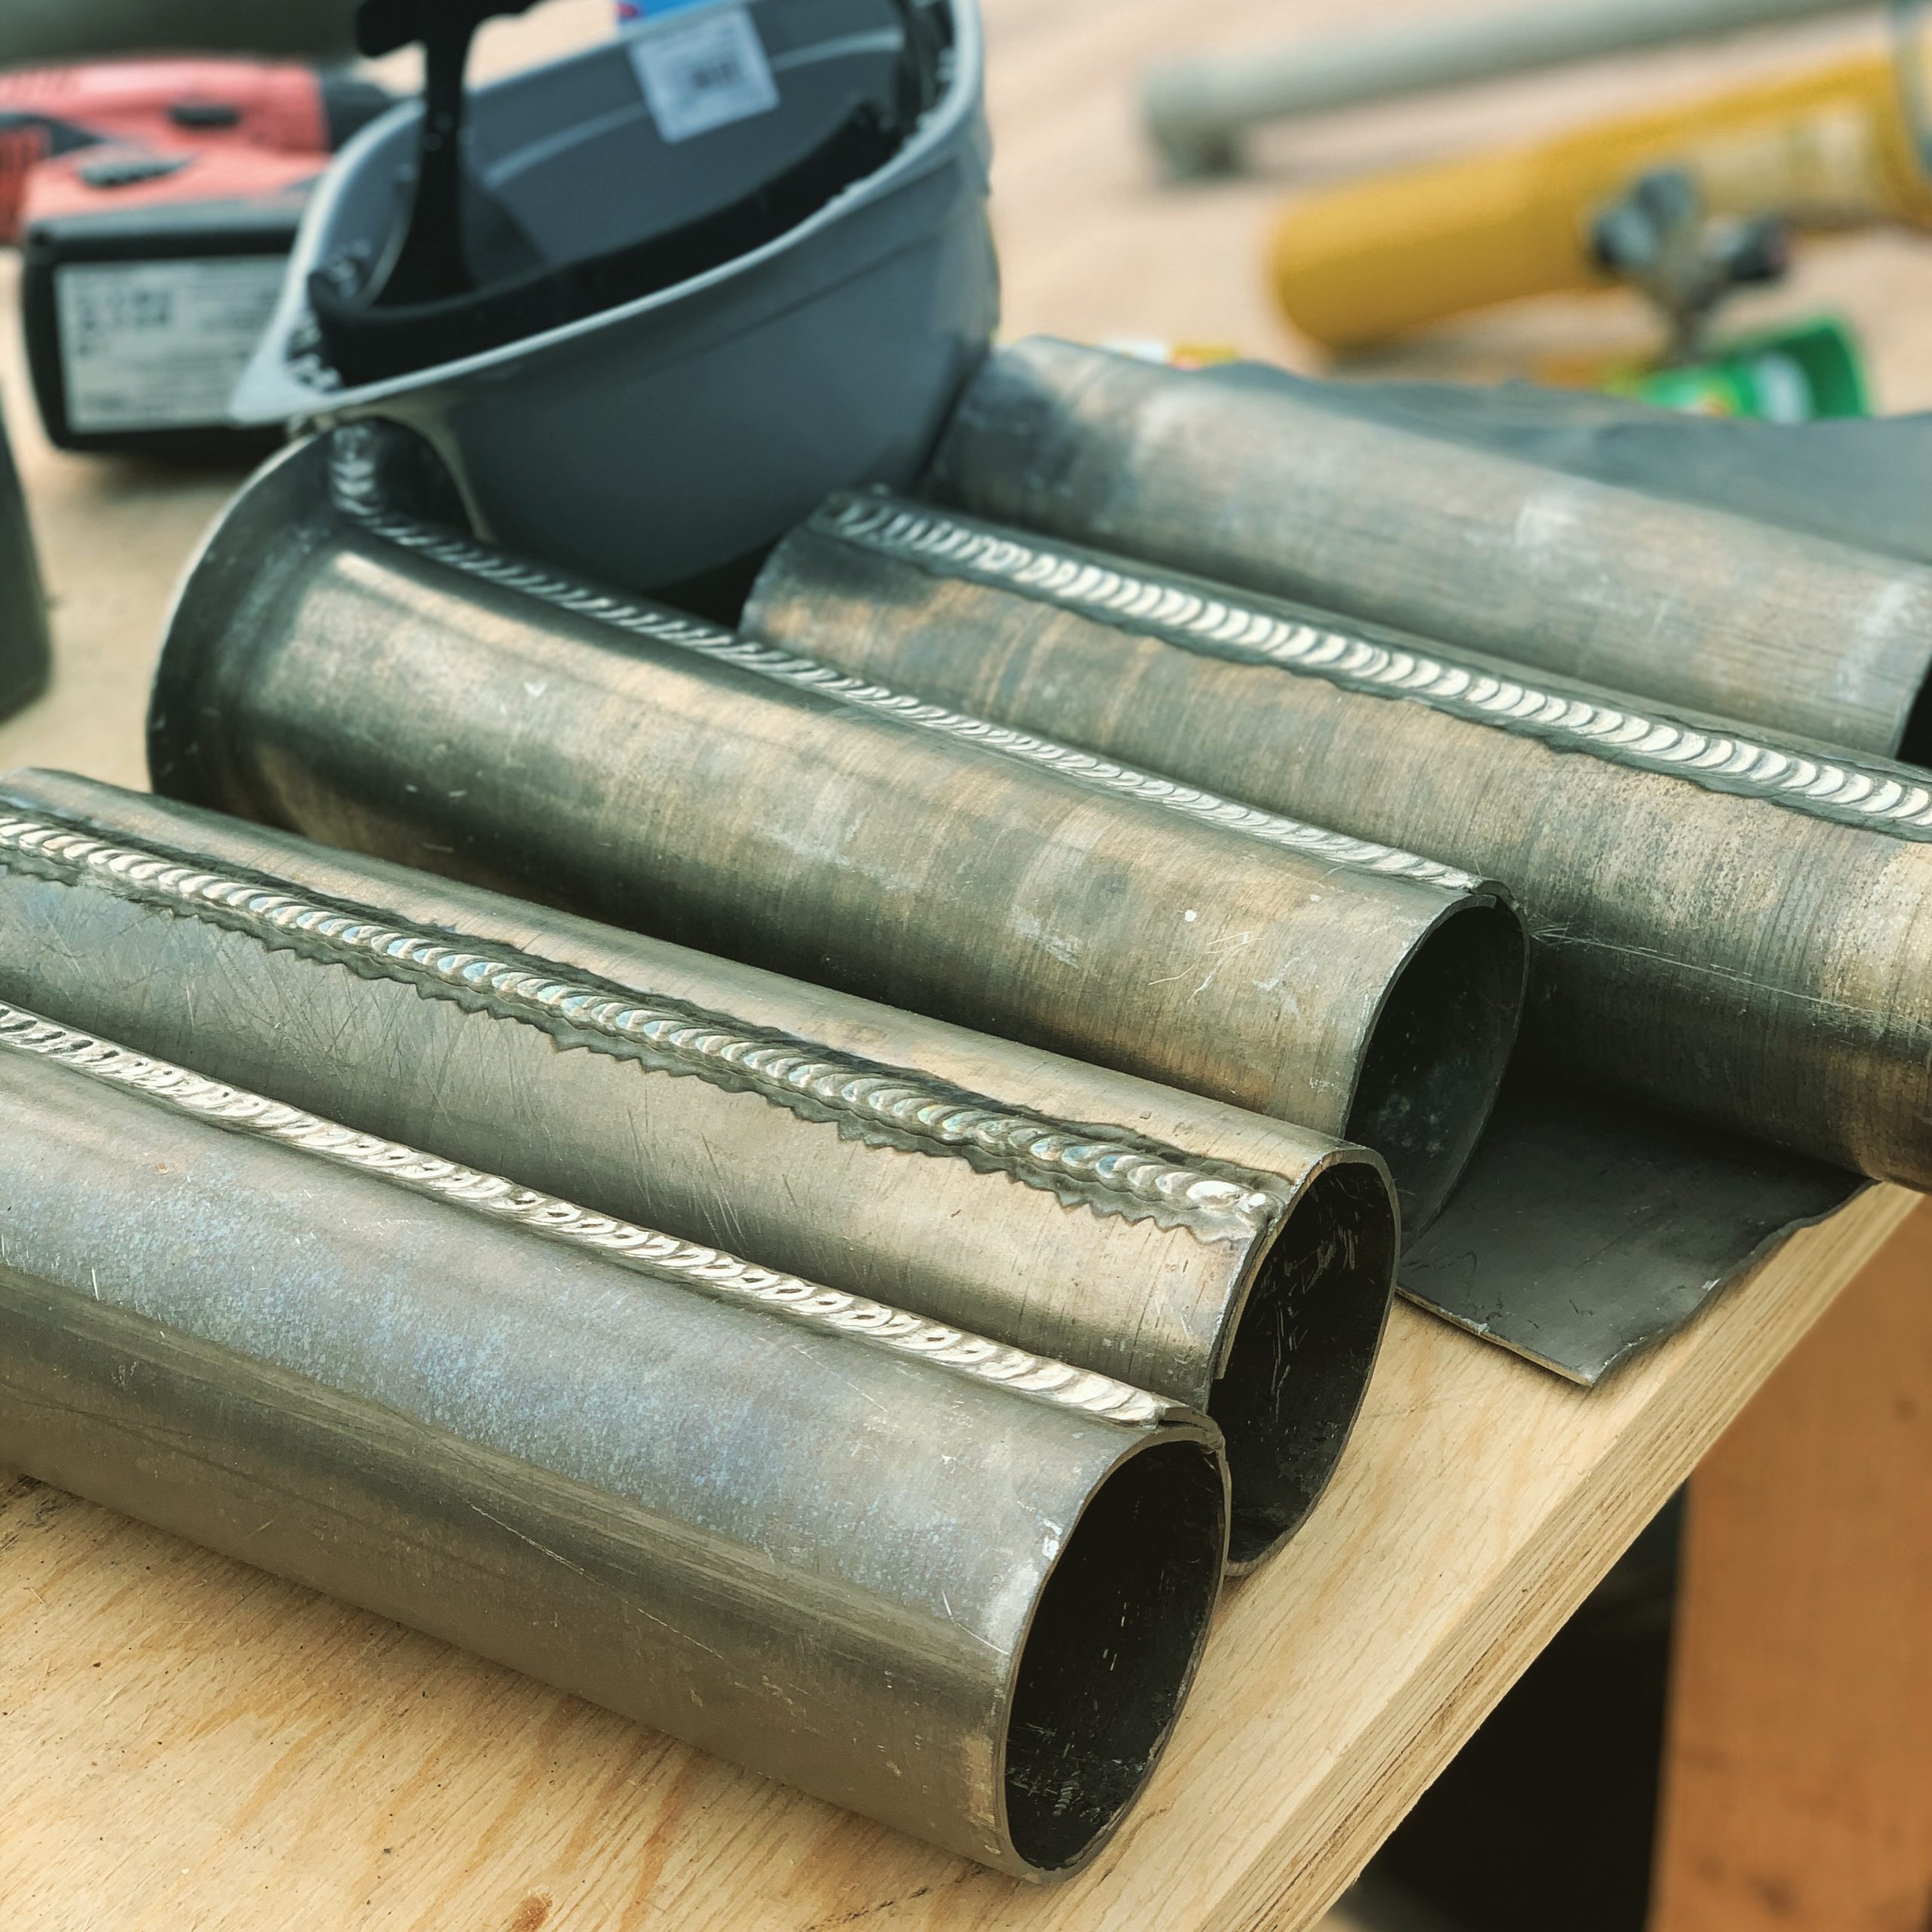
Types of Lead Weld
- Flat butted seam: used to join flat fully supported lead sheet.
- Flat lapped seam: often useful where fire risk from the torch must be reduced.
- Inclined or vertical seam: used for bay corners and vertical interfaces.
- Upright seam: used where other methods are not practical.
- Horizontal lap seam: used where a lapped horizontal weld is required.


Hot Works
Our Hot Works ProcedureHot works require particular care on historic buildings, listed structures, churches, conservation projects and buildings managed by organisations such as Historic England or the National Trust.
Before welding lead, always consider whether there is a safer alternative method. If hot works are unavoidable, a permit-to-work system, fire watch, extinguishers, substrate wetting, safe access, ventilation and end-of-day fire checks should be in place.
Lead Flashings
Lead flashings are primary weathering details at junctions where roofs meet walls, chimneys, dormers, abutments or upstands. Correct code choice, lap length, chase depth, fixing method and movement allowance are essential.
Step Flashings
Step flashings are used at pitched roof abutments against masonry. The steps follow the brickwork or stone coursing and provide cover over soakers or the roof covering.
- Typical code: Code 4 for general conditions.
- Consider Code 5 in more exposed or coastal locations.
- Keep individual pieces to appropriate lengths, commonly around 1.5m or less.
- Maintain suitable laps, often around 100mm.
- Chase into masonry, wedge and point with suitable non-acidic material.
Apron Flashings
Apron flashings provide cover where a vertical surface meets a lower roof area, such as the front of a chimney, dormer or abutment. The apron should shed water cleanly onto the primary roof covering.
Cover Flashings
Cover flashings protect upstands and allow the lining beneath to expand and contract independently. They are often used at parapet gutters, abutments and box gutter details.
Chimney Flashings
A complete chimney flashing set usually includes a front apron, side soakers or stepped flashings, and a rear back gutter. Each element must be detailed for free drainage and movement.
Best Practice for Lead Flashings
- Limit individual flashing lengths to reduce movement stress.
- Use correct overlaps and weathering laps.
- Avoid fixing through areas that need to move.
- Use clips where wind uplift restraint is needed.
- Use patination oil on exposed leadwork.
- Ensure the roof covering and lead detail work together.
Related Lead Flashing Guides
Lead Flashing FAQs
Around 1.5m is commonly used for individual flashing pieces, with suitable laps. Final sizing should reflect the exposure, detail type and applicable guidance.
A chase depth of approximately 25mm is commonly used, with the lead wedged and pointed using a suitable non-acidic mortar or sealant.
Code 4 is typical for many step flashing applications. Code 5 may be more suitable in exposed, coastal or more demanding locations.
Cold lead roofs usually need continuous ventilation beneath the substrate. A correctly detailed warm roof with a sealed vapour control layer may avoid the need for ventilation.
Common causes include excessive bay sizes, incorrect fixing, hard restraint, poor movement detailing, unsuitable substrates and failure to follow leadwork guidance.
Need Leadwork Advice, Materials or Installation?
The Lead Lads ® provide specialist leadwork services and online supply for rolled lead sheet, fixings, underlay, patination oil and wood rolls.
Buy Leadwork Materials Direct
Leadwork Locations
Survey, supply and installation of rolled lead sheet across Yorkshire and the North of England.
York
Harrogate
Leeds
Ripon
Knaresborough
Scarborough
Whitby
Hull
Sheffield
Doncaster
Durham
Newcastle
Middlesbrough
Leadwork FAQs
What is leadwork?
Leadwork is the use of rolled lead sheet to form roofing details such as flashings, valleys, gutters, roof coverings, dormers, bays, ridges, hips and weatherings.
Which British Standard applies to leadwork?
Rolled lead sheet should be manufactured to BS EN 12588. The design and construction of fully supported lead sheet roof and wall coverings is covered by BS 6915:2001+A1:2014.
Which code of lead is best for flashings?
Code 4 is commonly used for many lead flashing applications. Code 5 or heavier may be appropriate for exposed locations, longer details or more demanding weathering conditions.
Do lead roofs need ventilation?
Cold lead roofs normally require continuous ventilation beneath the substrate to reduce condensation and underside corrosion risk. A properly detailed warm roof may remove the need for ventilation.
Why should patination oil be used on lead?
Patination oil helps reduce early white carbonate staining and run-off marks on surrounding materials. It should be applied to exposed leadwork during and after installation.
Shop, Specify or Install Leadwork
Shop The Lead Shop
Book Leadwork Services
Read Leadwork Standards

Pingback: Leadwork specialist near me | The Lead Lads