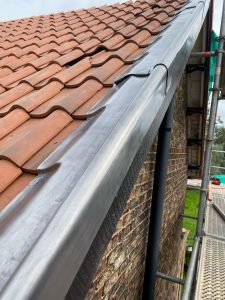
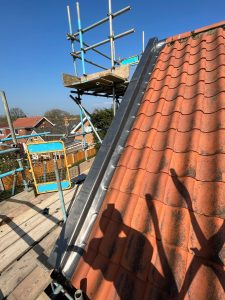
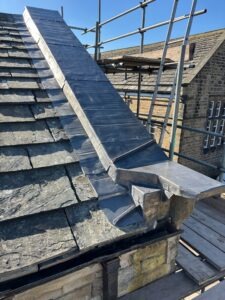
This lead bay roof restoration was completed in around 2 days, excluding access setup.


The Lead Lads provide specialist leadwork services for bays, flashings, valleys, gutters and traditional roof details.
The Old School in Howsham, North Yorkshire, is a Grade II listed building with a rich history. Constructed in 1852, it was rebuilt by Colonel Cholmley, as indicated by the datestone above the central window. The structure is built from rockfaced limestone ashlar and rubble, featuring a pantile roof and a single-storey design. Its architectural elements include an ogee-arched doorway, flanked by similar windows with brick arches.
Although the clay tiles on a roof like this can last for centuries, structural movement and deterioration of supporting materials, can ultimately lead to the roof failing. The underlay, battens, fixings and flashings often fail first. Freeze-thaw action can crack and spall tiles, corroded nails allow tiles to slip, and roof timbers may sag or decay. Failed mortar, ridge pointing and chimney or valley flashings can allow water ingress. Moss, poor repairs and foot traffic can worsen the problem. Typical signs include cracked or missing tiles, sagging roof slopes, damp patches, leaks around chimneys, moss growth and crumbling mortar.
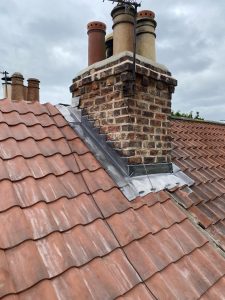
Chimney flashings are important because they create a watertight junction between the chimney and the roof, preventing rainwater from penetrating where the roof covering meets the masonry. Since a chimney interrupts the slope of the roof, water naturally collects and flows around it, making this one of the most vulnerable areas for leaks. Properly installed flashings direct water safely onto the roof surface and away from the building structure, helping to prevent damp, timber decay, staining and damage to ceilings or roof timbers.
The roof failed because the original clay tiles had reached the end of their service life. Many tiles showed severe delamination and spalling, with the outer surface breaking away and exposing softer clay beneath due to long-term wetting and freeze-thaw damage. Heavy moss and lichen growth worsened the decay by trapping moisture and forcing apart joints. Several tiles were cracked, loose and uneven, suggesting that the underlying fixings or battens had corroded or deteriorated. As the tiles slipped and no longer overlapped properly, wind-driven rain was able to penetrate beneath the roof covering.
The chimney flashings on inspection were relatively new and is probably a repair to address a historical leakage at the chimney, but it would not solve the broader failure of the surrounding roof covering. The widespread tile decay, biological growth, and slipped courses indicate that water is likely entering through many areas of the roof rather than one isolated detail. Flashings therefore were replaced as part of whole roof covering replacement.
The flashings in this case were renewed as part of a wider restoration works involving the replacement of the ageing clay tile roof. It consists of lead sheet flashing installed around a brick chimney where it passes through the tile covering. The detail includes apron flashing at the front and downslope side of the chimney, step flashing along the sides that is integrated with the roof tiles, and a back pan or saddle flashing on the upslope side to direct water around the chimney. The vertical lead pieces inserted into the mortar joints of the brickwork are the counter flashing, which overlaps the roof flashing below to create a watertight seal.
The chimney flashings were replaced using new rolled lead sheet manufactured to BS EN 12588, ensuring correct purity, thickness and durability. Code 4 lead was used for the stepped cover flashings and Code 5 for the back gutter and apron, selected in accordance with BS 6915. The flashings were divided into separate lengths to accommodate thermal movement and prevent splitting. Each piece was chased into the mortar joints to the correct depth, wedged and pointed, rather than rigidly fixed. Laps, drips and welts were formed in accordance with Lead Sheet Association guidance, and the lead was fully supported over the tiled roof and timber substrate.
This project used a straightforward but important group of materials, each chosen for a clear purpose within the chimney flashing execution.
If you are trying to understand which code of lead is right for a similar detail, our shoppable lead chart is a useful starting point. For broader product learning, see The Lead Handbook and our lead roofing guides.

This project shows that good chimney flashings rely on using the correct lead code, proper support and careful detailing. The flashing must be formed as separate apron, step and back gutter pieces so each section can move independently without splitting. The lead should be fully supported, chased into sound mortar joints and installed with adequate laps to direct water safely around the chimney. It also demonstrates that even a new roof will fail if the flashing is poorly detailed, while correctly installed leadwork to BS 6915 and BS EN 12588 provides a durable, watertight junction between the chimney and roof.
Chimney flashings are a common source of roof leaks and should be checked regularly.
Correctly installed lead flashings need proper support, laps and separate pieces to last.
Replacing flashings during reroofing is more effective than trying to repair old lead later.
Signs include leaks, cracked mortar, loose lead, slipped tiles or staining inside the property.
Code 4 is typically used for step flashings and Code 5 for aprons and back gutters.
Good quality lead flashings can last 50 years or more if correctly installed.
In most cases, yes, as old flashings are often disturbed or near the end of their life.
Yes, the lead and installation should always comply with these British Standards.
You can explore lead roll, lead flashing, fixings, underlay and guides through the Lead Lads Shop.