The Lead Lads Completed
Leadwork to Rainwater Downpipes
Traditional Lead Weathering Detail

Project Detail
This project involved specialist lead weathering around a rainwater downpipe penetration and adjoining abutment.

Leadwork Type
Lead flashings, upstands, collars and weathering details formed around rainwater pipework.

Leadwork Services
The Lead Lads provide specialist leadwork services for outlets, downpipes, flashings, gutters and roof details.
Leadwork Project Details | The Lead Lads ®
The Property
Leadwork to Rainwater Downpipes
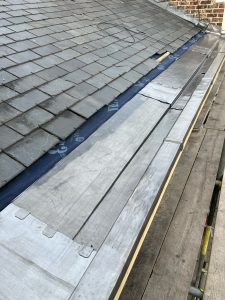
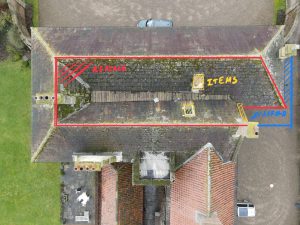
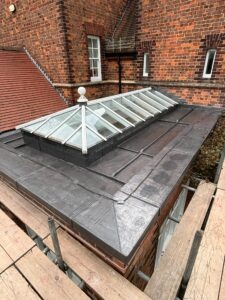
This project involved forming specialist leadwork around a rainwater downpipe where the pipe penetrated through a lead-covered roof or gutter detail. The work required careful dressing, welding and weathering to prevent water tracking around the pipe and into the surrounding structure.
Rainwater downpipes often pass through, beside or immediately adjacent to lead gutters, flat lead areas, abutments and masonry junctions. These areas are vulnerable because they combine moving water, pipe penetrations, vertical upstands and changes in direction.
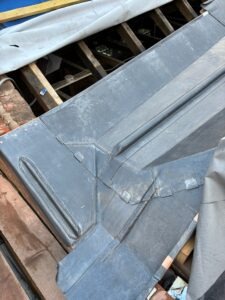
The completed detail included lead upstands, flashings, a formed collar around the pipe, clipped edges and welded junctions to create a durable weathering detail around the rainwater outlet position.
Why Downpipe Leadwork Needs Careful Detailing
Where a downpipe passes through leadwork, the junction must be formed properly. Poor detailing can allow water to track around the pipe, sit behind the upstand or enter the building fabric at the wall junction.
Downpipe details also need to accommodate movement. Lead expands and contracts with temperature changes, while rainwater pipes may move independently. The weathering must therefore be secure, durable and carefully formed without unnecessarily restricting the lead.
Leadwork Standards and Technical Approach
From the outset, the focus was on watertightness, movement allowance, neatness and long-term weathering performance.
- BS 6915 informed the design and installation of the fully supported lead sheet and weathering details.
- BS EN 12588 governed the rolled lead sheet material specification.
- Lead Sheet Association guidance informed fixing principles, bossing, welding, clipping, collars, flashings and outlet formation.
In practice, that meant forming reliable upstands, clipped weatherings and a neat lead collar to suit the pipework. The detail needed to shed water effectively while keeping the pipe penetration weatherproof.
Contact us about leadwork More leadwork resources and guides The leadwork LinkSpecification of Works
Preparation and Removal
- Carefully inspected the rainwater downpipe position and adjoining leadwork.
- Checked the pipe penetration, wall junction and surrounding masonry before installation began.
- Prepared the supporting base and upstand areas to receive new lead weathering.
- Protected surrounding brickwork, pipework and adjacent roof details during the works.
Substrate and Support
- Prepared the base area to suit the new lead flashing and collar arrangement.
- Checked falls and water discharge paths around the downpipe position.
- Formed perimeter upstands to suit the pipe, wall and gutter geometry.
- Prepared the pipe penetration to receive a close-fitting lead collar and weathering detail.
Leadwork Installation
- Installed new Code 5 lead weathering around the rainwater downpipe area.
- Formed lead upstands to protect the wall and pipe penetration.
- Created a lead collar around the downpipe to weather the circular junction.
- Fitted lead flashings to the brickwork and secured them with suitable clips.
- Used lead bossing and welding to shape the junctions neatly and accurately.
- Completed the detail so water could discharge safely without tracking behind the leadwork.
Finishing and Protection
- Applied patination oil to all newly completed leadwork.
- Checked the finished details for continuity, movement allowance and water run-off.
- Cleaned down the detail so the finished work sat neatly against the brickwork and rainwater pipe.
The Materials
For this project, we selected traditional leadwork materials suited to pipe penetrations, outlet detailing and long-term weathering performance.
- Code 5 lead
- Copper clips and fixings
- Lead flashings
- Lead collar detail
- Lead-compatible sealant
- Patination oil
If you are comparing materials for a similar downpipe or outlet detail, our shoppable lead chart is a helpful place to start. In addition, you can explore broader product guidance through The Lead Handbook and our lead roofing guides.
Shop Lead Materials Lead Weight Calculator
Skills Required
- lead welding
- lead bossing
- forming pipe collars
- forming outlets and drainage details
- integrating lead flashings

What This Project Teaches About Rainwater Downpipe Leadwork
Leadwork around rainwater downpipes is about more than simply sealing around a pipe. The surrounding upstands, wall flashings, pipe collar, clips and welded junctions all need to work together to manage water and protect the building fabric.
This project shows why pipe penetrations and rainwater outlets should be treated as specialist weathering details. These junctions are often exposed to concentrated water flow and can quickly become a source of leaks if not formed properly.
Property Owner Takeaways
- Downpipe penetrations need properly formed collars and upstands.
- Outlet and rainwater details must be shaped to shed water safely.
- Welded leadwork helps form durable pipe junctions and corners.
- Correct clips and movement allowance are essential for long-term performance.
Related Lead Lads Resources
- Lead roofing projects
- Leadwork standards hub
- Leadwork services
- Shoppable lead chart
- Lead roll
- Leadwork fixings
Frequently Asked Questions
Why is leadwork needed around rainwater downpipes?
Leadwork protects the junction where pipework passes through or sits beside a roof, gutter or wall detail.
What is a lead pipe collar?
A lead pipe collar is a formed weathering detail that seals around a circular pipe penetration.
Why do downpipe details leak?
Common causes include poor collars, failed sealant, weak flashings, split leadwork or water tracking behind the upstand.
Can lead be welded around a pipe?
Yes. Lead welding is often used to form durable junctions, corners and collars around rainwater pipework.
Does pipework movement matter?
Yes. Lead and pipework can move differently, so details should be formed to remain secure without placing unnecessary stress on the lead.
Where can I buy lead flashing materials?
You can explore lead roll, flashings, fixings, underlay and guides through the Lead Lads Shop.